¶ Creating A Topia Poster Session
A Topia Poster Session is a part of a Topia World created at topia.io which contains posters presented by several authors at a given time. Conference attendees can virtually walk around the Topia World and visit with the paper authors and other attendees.
The process for creating a poster session involves several steps.
- A Topia World is created by the EventHosts staff which will be used to hold one or more poster sessions. In addition a Topia Poster Scene is created within the Topia World for a given poster session by the EventHosts staff and assigned to a workshop.
- A set of papers is selected for a poster session by the organizer(s). It is recommended that this is done on CMT or OpenReview.
- The set of papers is uploaded into the conference database which creates a set of Poster events (see Import Papers from CMT or OpenReview). Alternatively the data for each paper may be manually entered into the workshop using the schedule editor.
- The organizer of the poster session assigns each poster event to their Topia Poster Scene.
- The organizer builds the poster session for the Topia World. This step must be done anytime adding or removing any posters to the session.
- Each author of a selected paper creates and uploads a poster and a thumbnail image into the conference database.
- The poster rooms and their associated poster images are auto-uploaded to Topia as long as the scene is enabled.
Steps 2 through 5 are up to the organizers of the poster session, usually a workshop or affinity workshop organizer. The sixth step is usually performed by paper authors but may be completed by the organizer. The last step is performed by the Event Hosts conference support team, done repeatedly throughout the conference.
¶ Organizer Admin
The Organizer Admin page is used throughout the Poster Session organizing process that follows. Note that only Workshop Organizers and other Organizing Committee staff have access to these pages. If this link doesn't work the list of links for the different conferences is:
- neurips.cc Organizer Admin
- icml.cc Organizer Admin
- iclr.cc Organizer Admin
- mlsys.org Organizer Admin
- aistats.org Organizer Admin
¶ Loading papers into the conference database
The best way to load the papers into the conference database is to select the papers using either CMT or Open Review. After you've reviewed and selected the papers in either CMT or Open Review you can import the papers directly into the conference database by using the import from papers cmt or openreview wizard. The import loads each accepted paper's title, abstract and authors.
Alternatively each papers title, abstract and authors may be entered into the website database using the schedule editor.
¶ Add the Poster World URL into the Workshop Schedule
If desired the general poster world URL can be added into a Workshop Schedule to a poster session event if you have one. Individual poster links should automatically show up for each poster event.
¶ Adding Posters to Topia Poster Scene
There are two ways to add posters to a Topia poster scene. This section describes how to add many posters at once. The next section describes how to add, delete or move individual posters to a room.
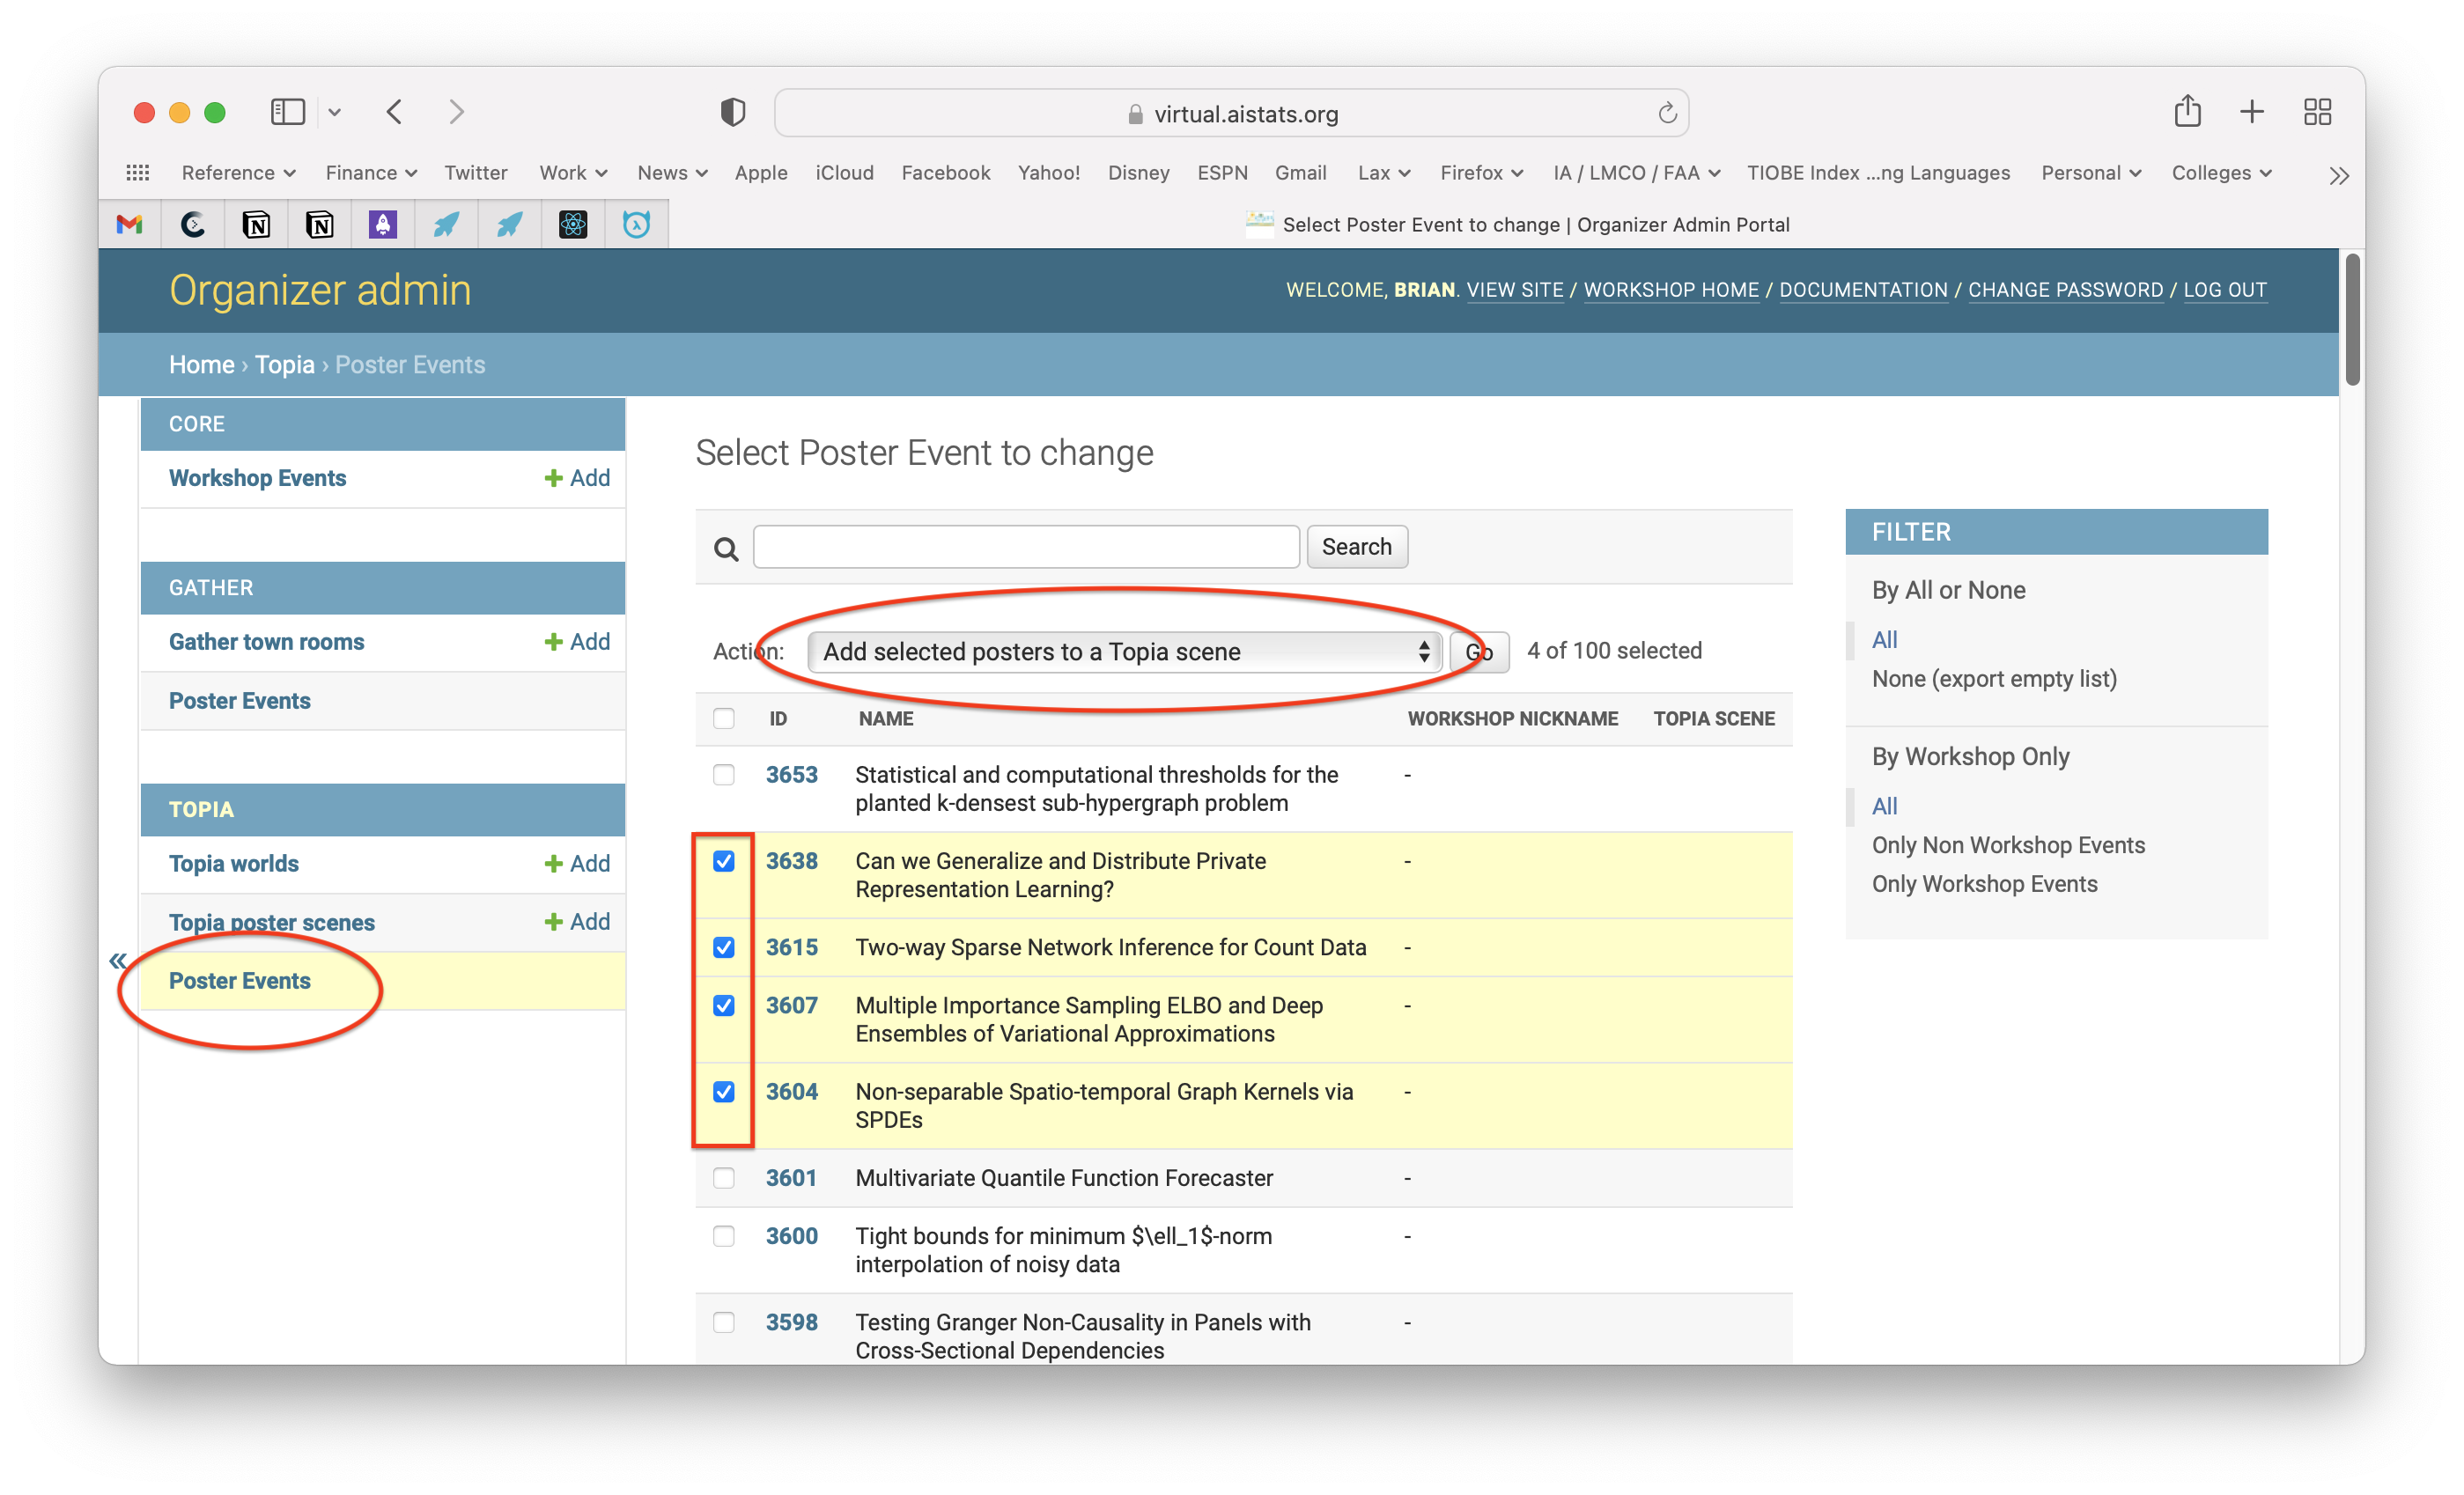
Posters can be bulk added to a world on the Poster Events page under the Topia section of the Organizer Admin page (See How Are Workshop Poster Events Identified if you don't see poster events you expect). Go to the Topia Poster Events tab, check the boxes of the poster events you'd like to add and then in the Action drop down select "Add selected posters to a Topia scene". Here is how your page should look once you've done this:

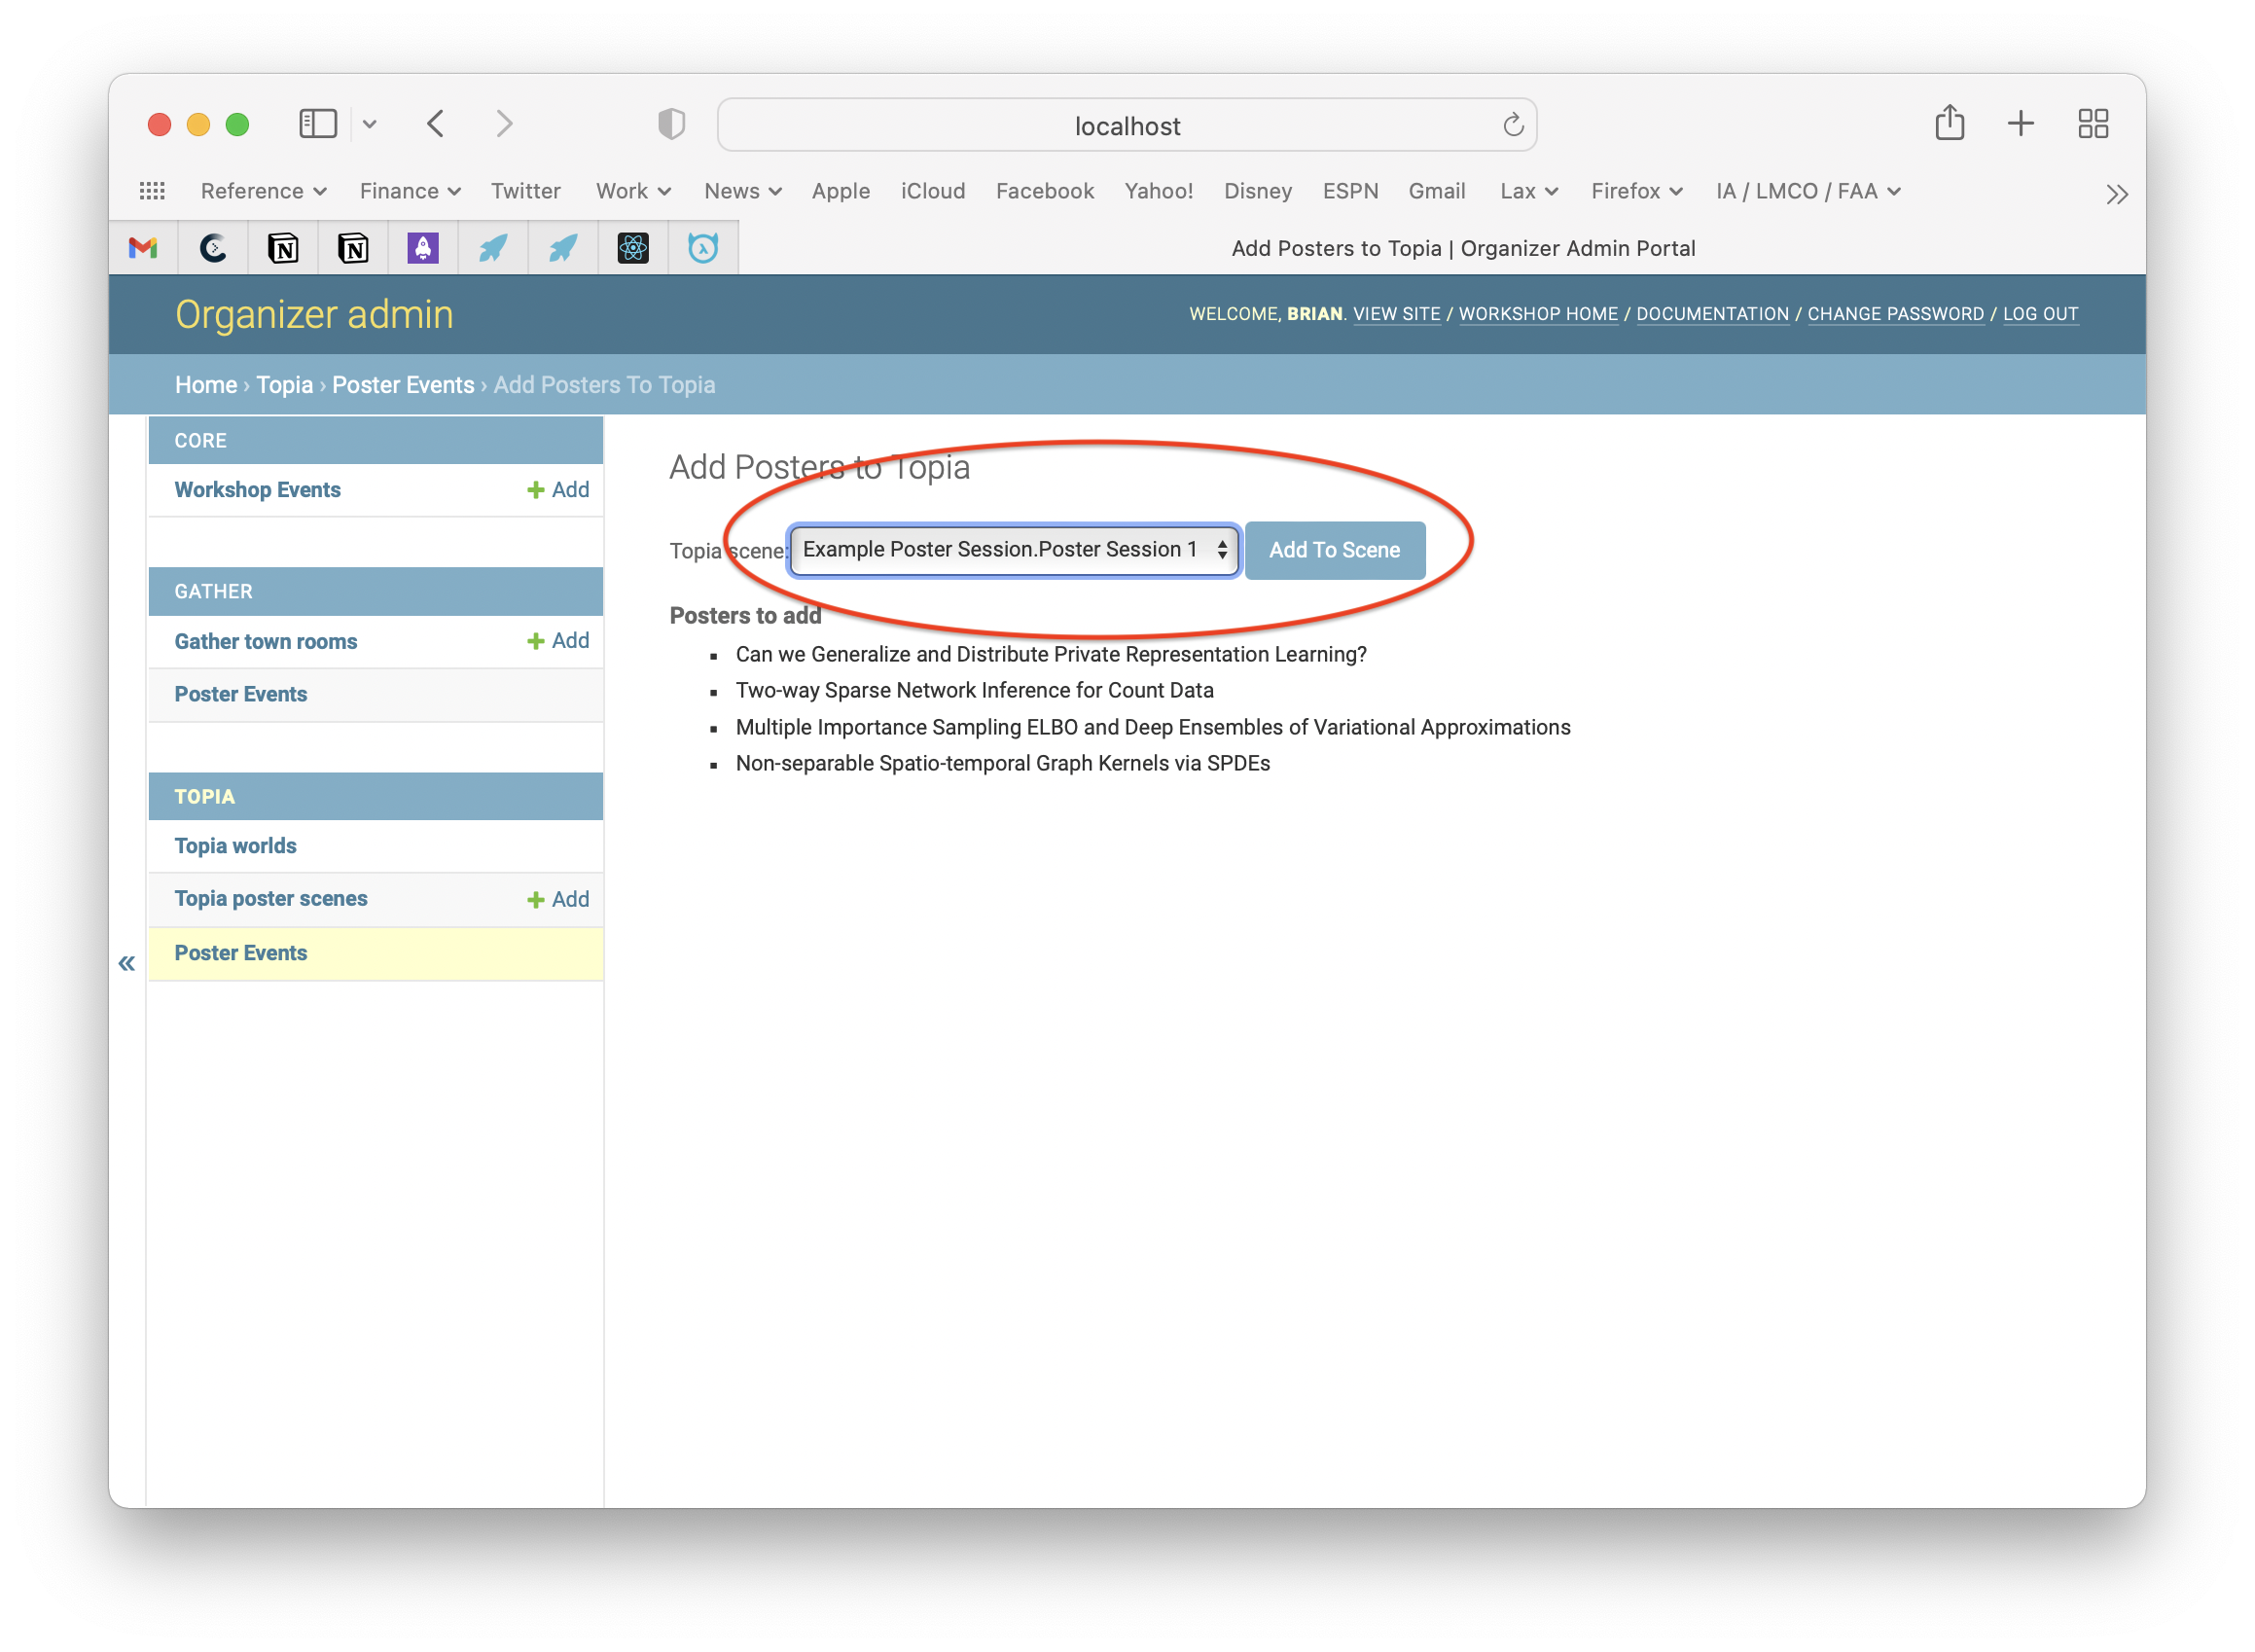
Then click the Go button next to the selected Action "Add selected posters to a Topia scne". On the next page select the Topia scene desired from the drop down list and click "Add To Scene".

After adding or removing posters posters to a scene the scene must be rebuilt, see the Build The Scene section below.
¶ Adding, Changing or Deleting Individual Posters to Topia Scenes
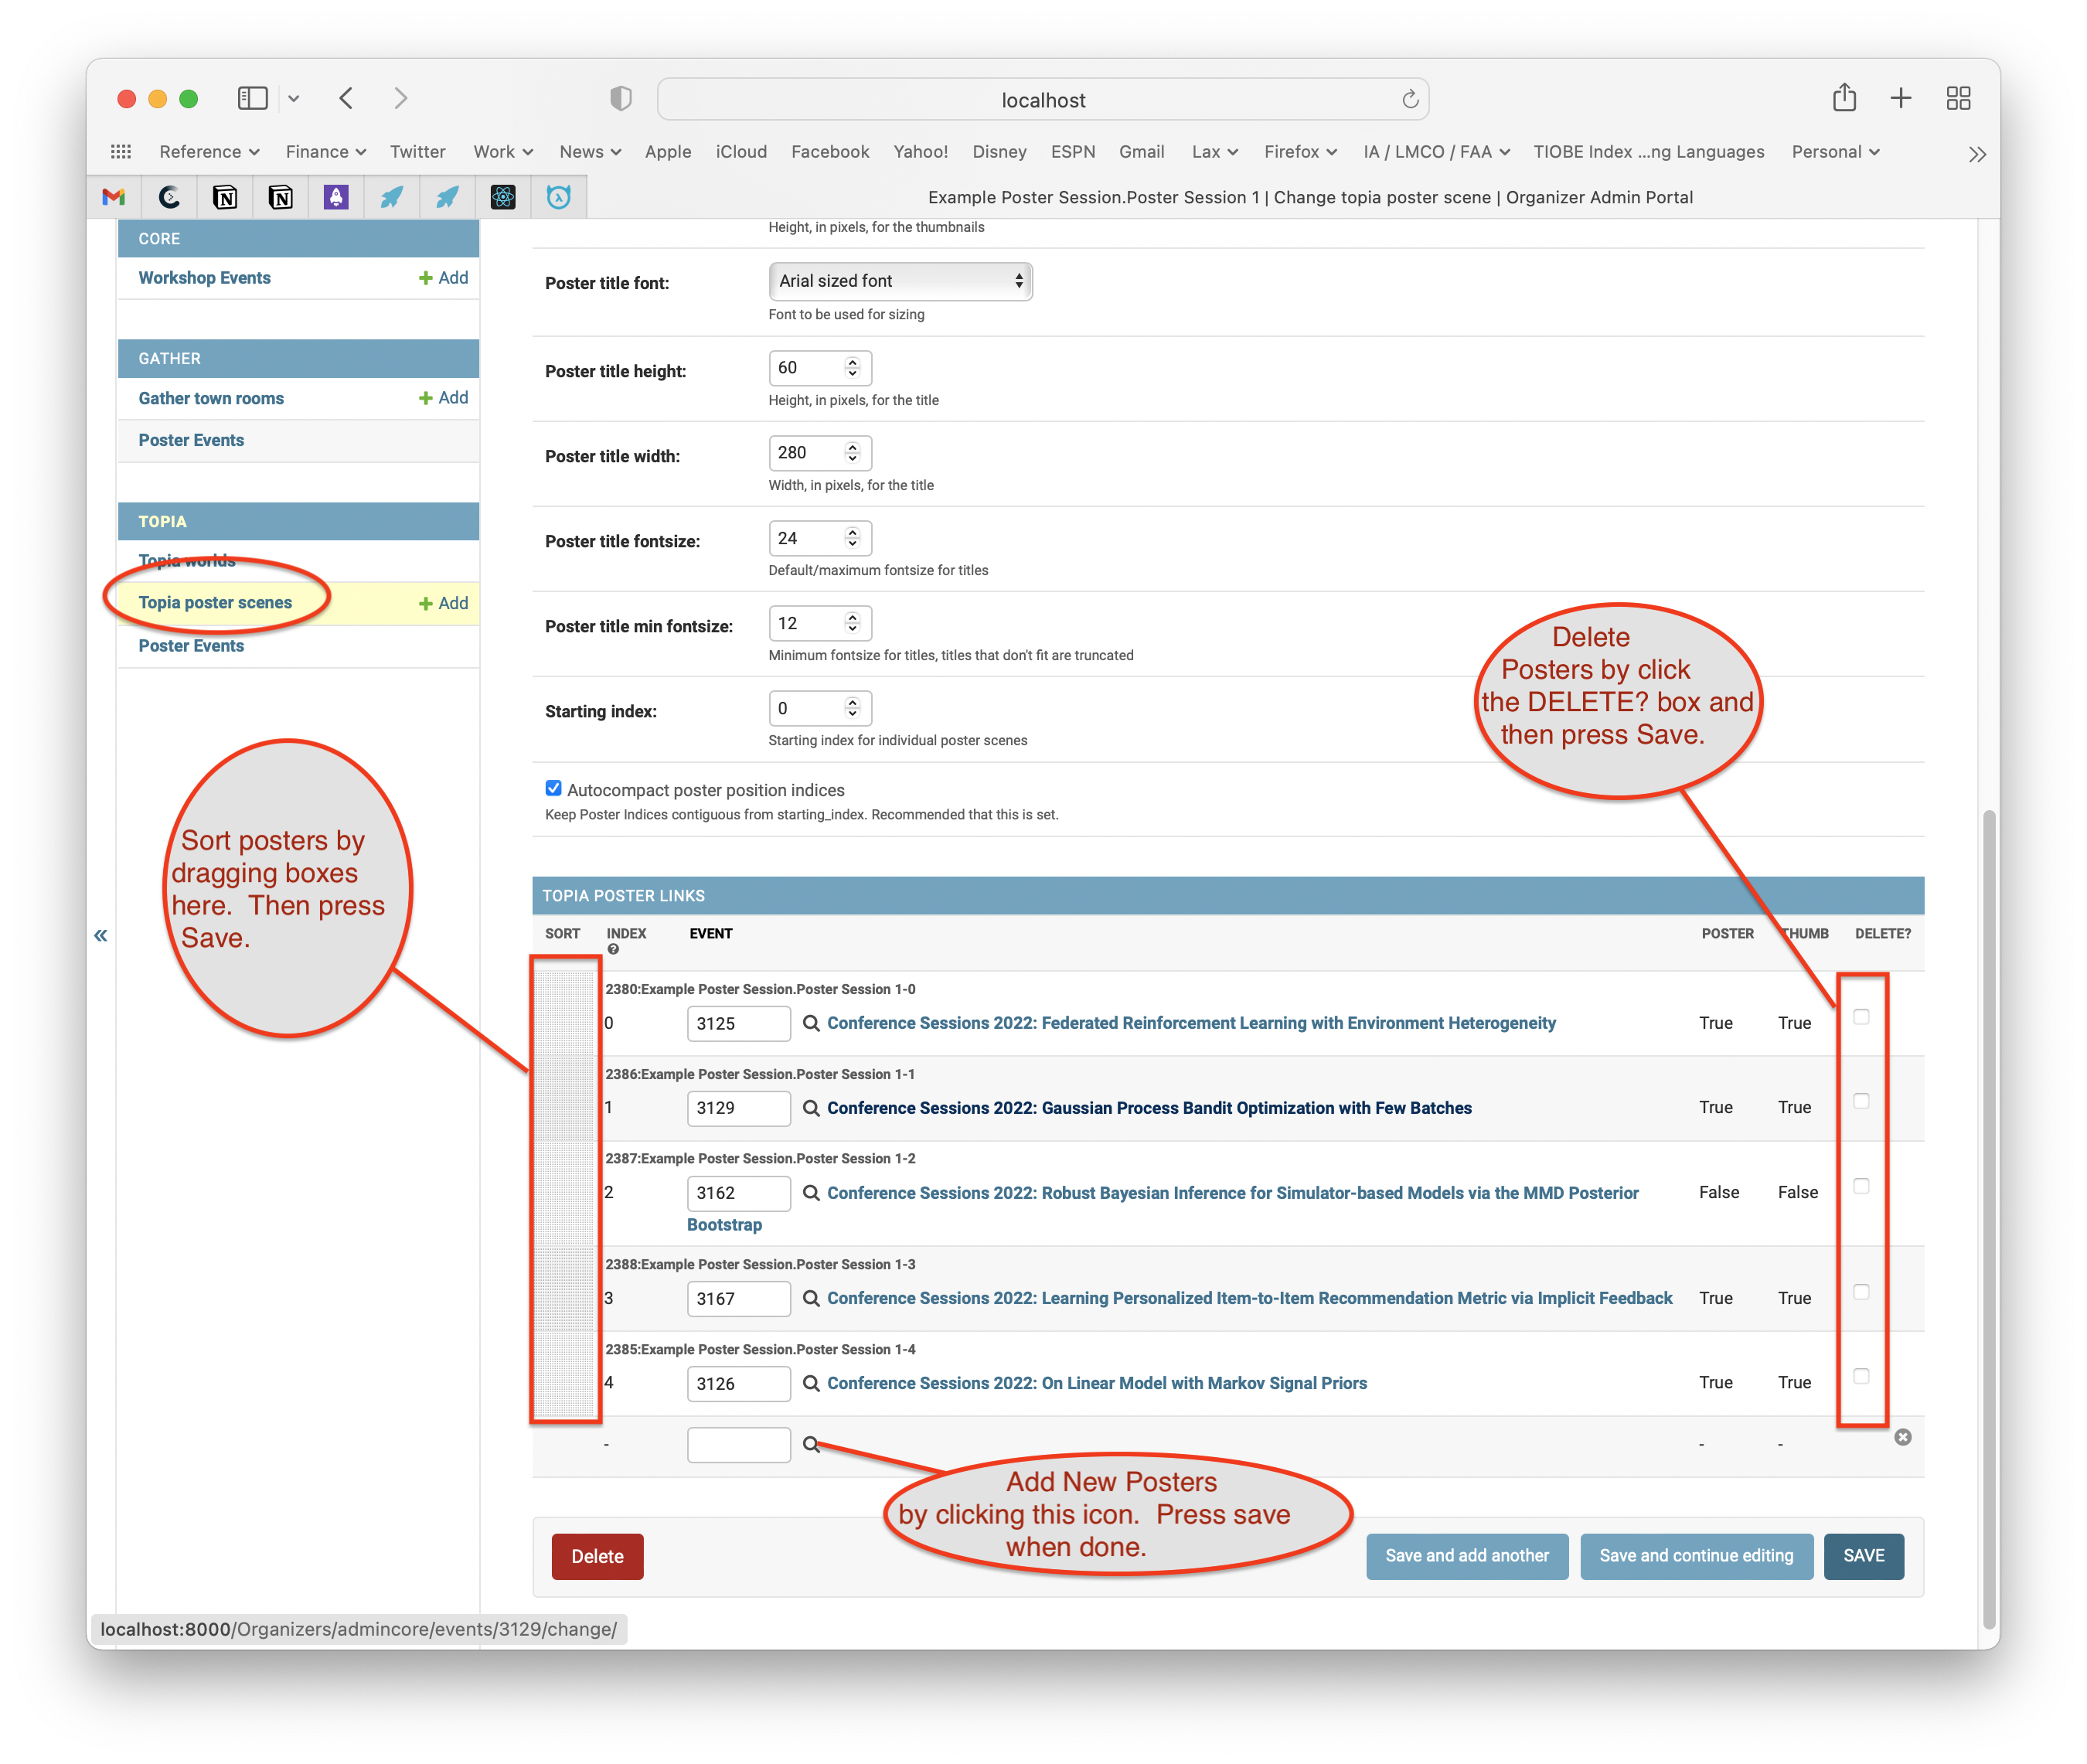
You can add, change, or remove individual posters in a Topia Poster Secne by going to the Organizer Admin page and clicking on the Topia poster scenes and then clicking on the Topia Poster Scene you wish to edit the posters for. Here is an example of this page:

To add a poster click on the Search icon at the bottom of the list of Topia Poster Links. This will bring up a search dialog where you can search for the paper by title. You must press Save at the bottom or top of the page after searching to save the change to the room.
To delete a poster click the "DELETE?" box to the right of the poster you wish to delete. You must press Save at the bottom or top of the page after searching to save the change to the room.
To reorder the posters drag the box under the SORT column on the left side of the poster. You must press Save at the bottom or top of the page after searching to save the change to the room.
After any adding, removing or moving a poster to a scene the scene must be rebuilt, see the Build The Scene section below.
¶ Build The Scene
In order for posters to show up in the Topia World the poster scene must be built. This step creates all the Topia assets for each poster in a poster scene. The process is slow and disruptive to the world while it is happening so it's recommended that you avoid doing this during the workshop. Note that this step does not need to be done when an author uploads a poster or thumbnail png file, it only needs to be done when adding or removing poster events from the scene.
The build may be done whenever necessary and should recreate the poster scene.
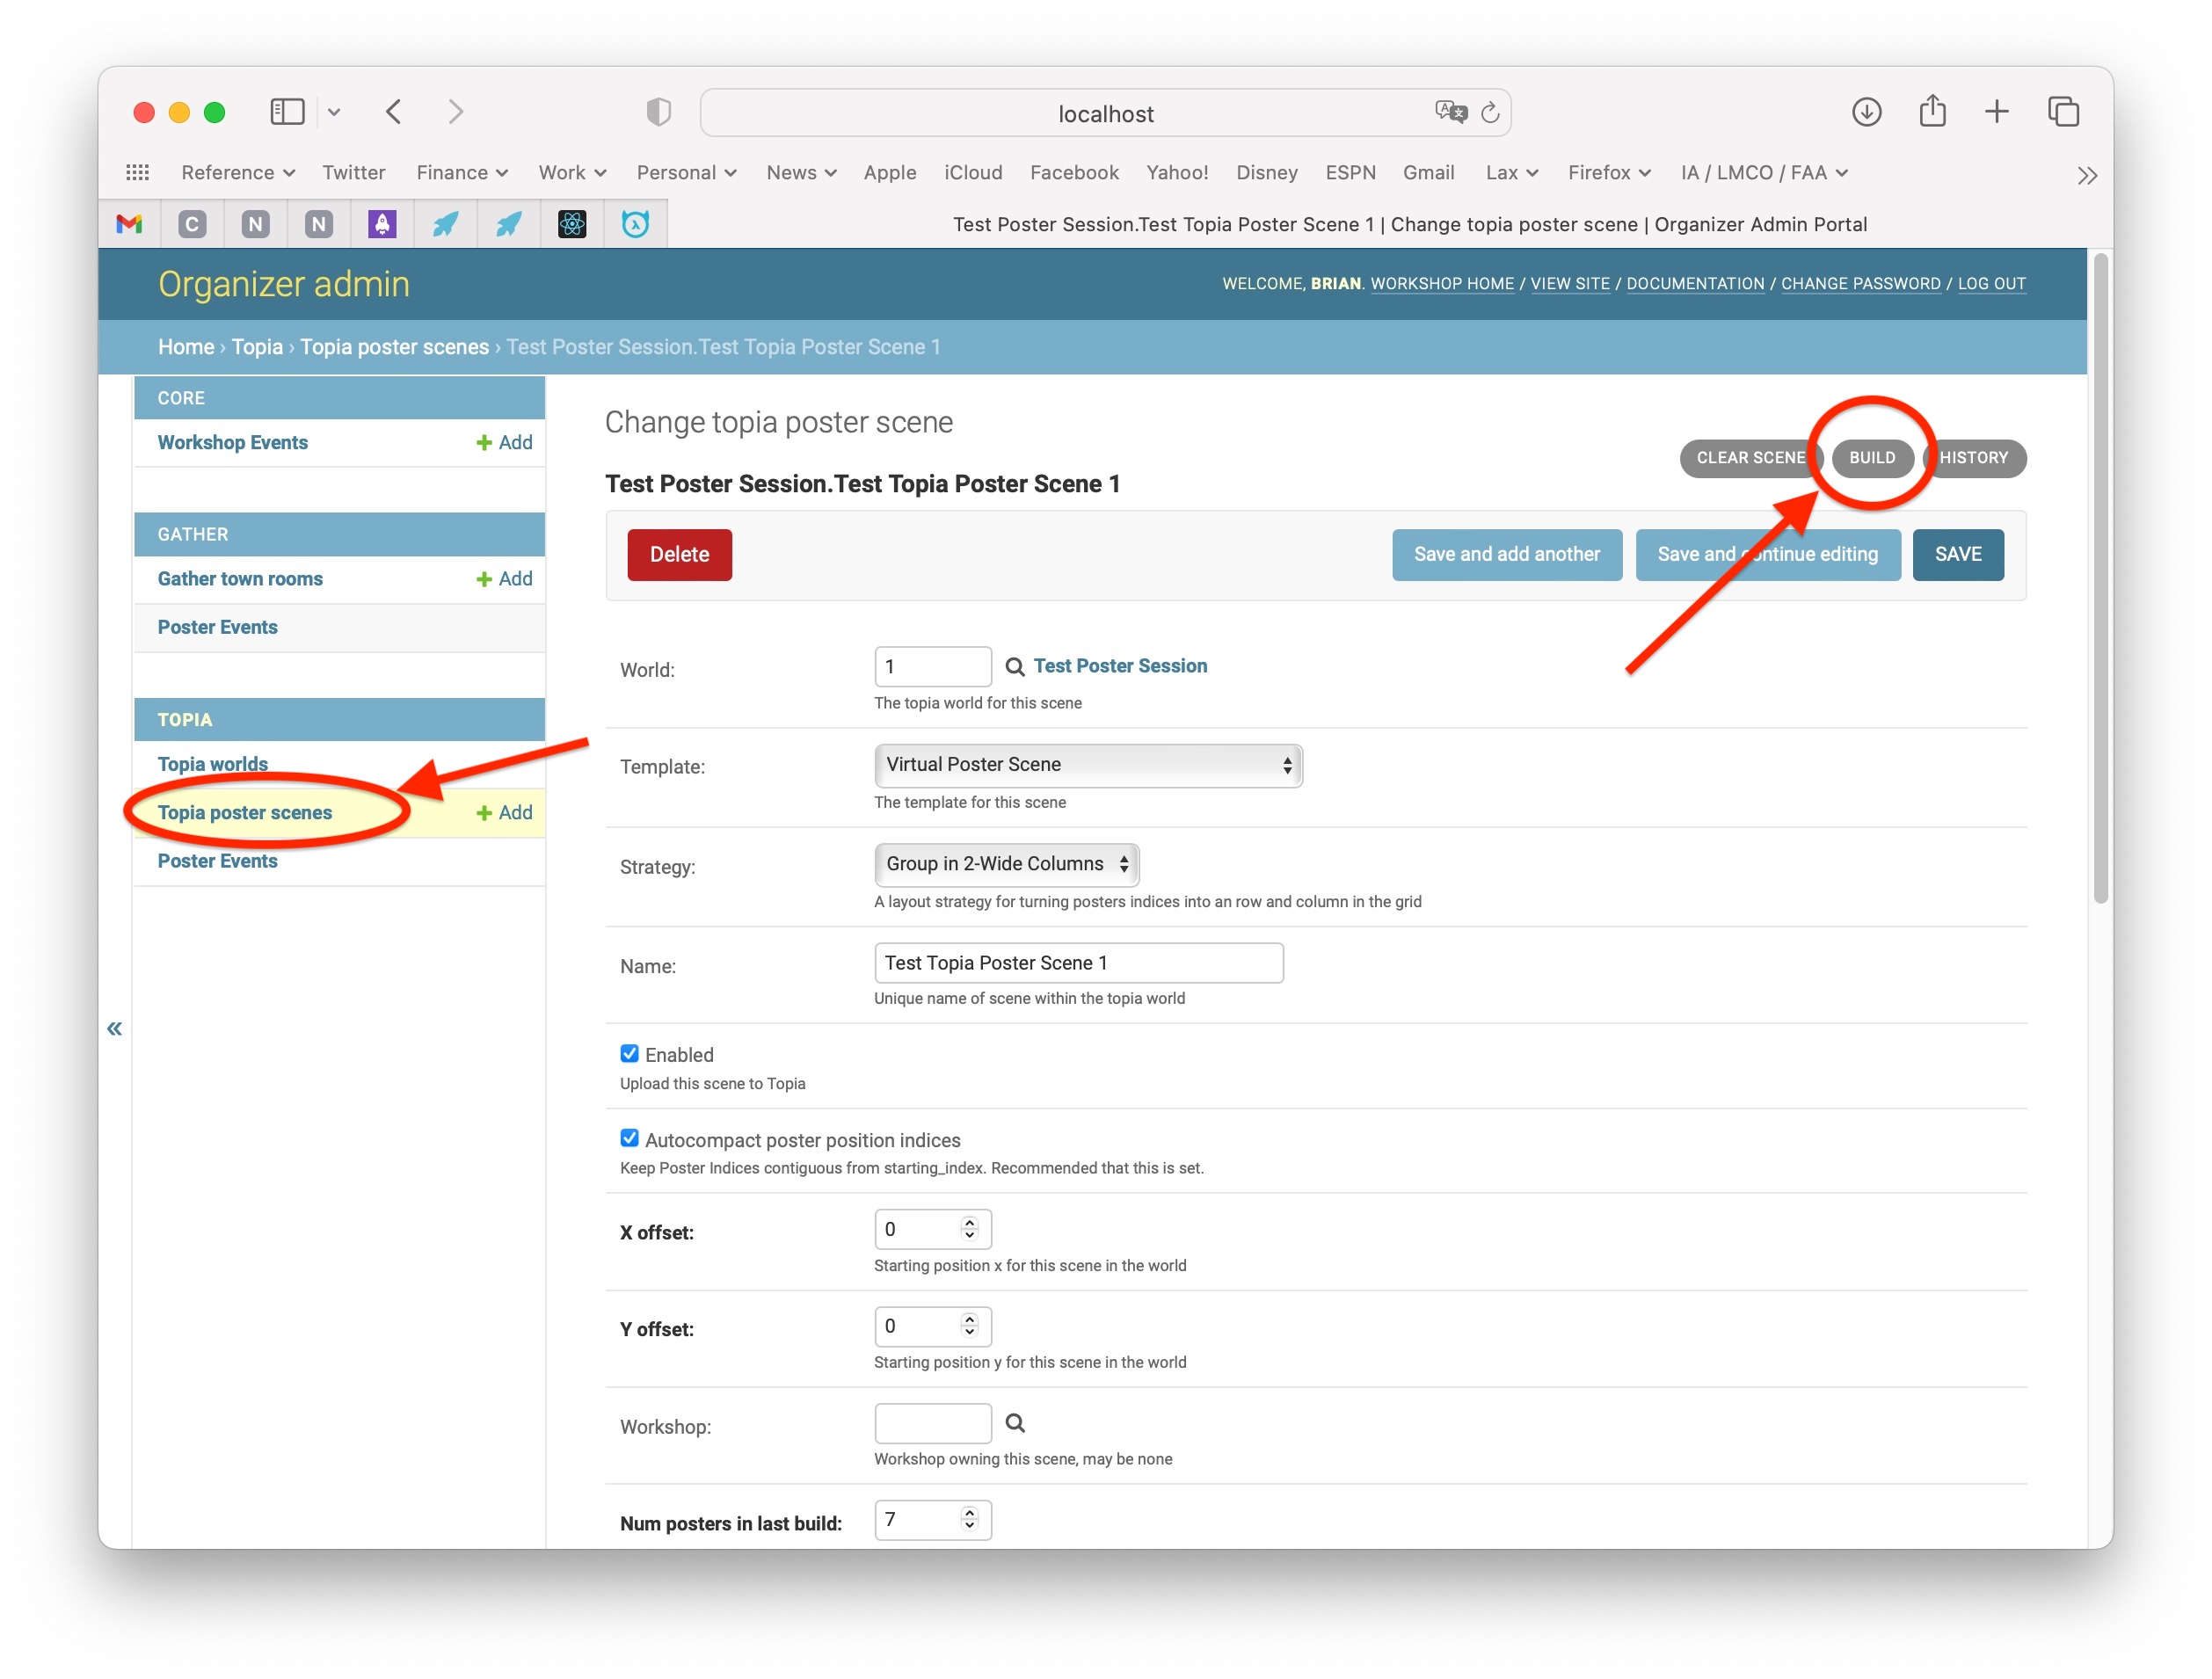
To build the poster scene go to the Topia Poster Scene page in the Organizer Admin open the scene for your virtual poster session and then click the Build button in the upper right of the page. The build button will recreate all the assets in topia.io for the Topia Poster Scene. See the image below.

¶ Get Your Authors to Upload Their Poster and Thumbnail Images
Authors must upload the poster and thumbnails images to one of
- neurips.cc Poster Upload
- icml.cc Poster Upload
- iclr.cc Poster Upload
- mlsys.org Poster Upload
- aistats.org Poster Upload
The poster should be updated in the Topia scene within a few minutes.
¶ Advanced Topia Topics (for Topia Template Creators)
Most organizers do not need to be familiar with this section. This is only for organizers possibly creating custom Topia worlds not using the standard topia poster session.
The mechanism by which Topia assets for Posters and Thumbnails are automatically updated by the conference is by finding the proper assets in a world based on the Topia. This is done by identifying the specific assets to be updated via their Topia "Unique Name" (aka "unique id"). Each poster position in a Topia Poster Scene has four assets each with a different unique id which identifies the different parts of the scene to be updated. The base name for each of the four unique ids are:
- poster-title_NNN - A Custom Text Asset of size 320x68 pixels
- poster-thumb_NNN - A Web Image Asset of size 320x256
- poster-link_NNN - Any asset of any size, recommended 20x20
- poster-background_NNN - Any asset of any size, recommended 320x348
Where "NNN" is replaced with the poster number. When a poster is uploaded to the conference site the website will update the poster-title, poster-thumb and poster-link assets. The poster-title is given a string and font size which attempts to fit into the 320x68 pixel region. The poster-thumb is given a url for the thumbnail image of the poster. The poster-link asset is given a url of the poster page on the conference website. The poster-background is not automatically updated but is used if the "Clear Assets" action is taken for a poster world.